You know the pattern: a dryer that used to finish a load in one cycle suddenly needs two, the laundry room feels humid, and you start wondering whether this is a simple clog or a real dryer vent repair problem.
The reason this matters is bigger than convenience. The U.S. Fire Administration says failure to clean was the leading factor in home clothes dryer fires for the 2018 through 2020 period, which is why slow drying, heat buildup, and burning odors should never be brushed off.
In my 25 years repairing appliances, I have found that most vent problems start with small airflow losses and turn expensive only when people wait too long.
So, I am going to walk you through the warning signs, the most common causes, the right cleaning and repair tools, and the points where calling a pro is the smartest move.
Key Takeaways
- Clean the lint screen before every load, and plan a full dryer vent inspection and cleaning at least once a year. If you have pets, heavy laundry use, or a long duct run, check it every 6 to 12 months.
- In many U.S. homes, the safest upgrade is simple: replace plastic or vinyl venting with 4-inch rigid metal ductwork and keep the transition hose behind the dryer as short and straight as possible.
- The 2024 International Residential Code uses a clear baseline for dryer exhaust: vent to the outdoors, keep the termination at least 3 feet from openings when the manufacturer does not give a different location, use a backdraft damper, and do not install a screen at the hood.
- Keep the exhaust run short. Many installations still use 35 feet as the baseline maximum before deductions for bends, but your dryer’s installation manual is the final word.
- If you smell burning, notice a hot dryer cabinet, or still have weak airflow after cleaning, stop using the dryer and schedule professional service before a small airflow problem turns into a fire or motor failure.

What Are Common Signs That Your Dryer Vent Needs Repair?

The earliest signs are usually practical ones: longer dry times, hotter clothes, extra humidity in the laundry room, lint near the vent opening, or a dryer that feels hotter than it used to.
Those symptoms all point to one problem, poor airflow. When moist air cannot leave the duct fast enough, the dryer runs longer, wastes energy, and pushes more heat back into the cabinet.
If you want a quick visual overview, watch this warning-sign video.
Why Is My Dryer Taking Longer to Dry Clothes?
Long dry times are usually the first clue that your vent path is restricted. The dryer can still spin and heat, but it cannot move damp air out of the duct fast enough, so every load takes longer and the heating system stays on longer than it should.
A very useful field check comes from Maytag’s vent guidance: run the dryer for 5 to 10 minutes, then place your hand under the exterior hood. If the airflow feels weak, especially weaker than a hair dryer on high, the vent is likely restricted and needs cleaning or repair.
- Check whether the short transition hose behind the dryer is crushed against the wall.
- Look outside to make sure the vent flap opens freely during operation.
- Watch for clothes that still feel damp after one normal cycle.
- Move your cleaning schedule up to every 6 to 12 months if you have pets, heavy use, or a long vent run.
Schedule service if dry times stay long after a basic cleaning, because that usually means the clog sits deeper in the duct or the vent route itself needs correction.
What Does a Burning Smell from the Dryer Mean?
A faint odor during the first few uses of a brand-new dryer can be normal. An ongoing burning smell from a dryer you have owned for a while is different, and it usually means lint, heat, or a failing part is where it should not be.
If your dryer smells like burning and the cabinet feels unusually hot, stop the cycle and stop using the machine until the vent path and heating system are checked.
In real service calls, the most common causes are lint collecting near hot components, a blocked vent trapping heat inside the dryer, or worn parts such as belts, rollers, or thermostats. If you have a gas dryer and you smell gas instead of a burnt odor, leave the area and get help right away.
Schedule service for a fast inspection to protect your home and restore proper ventilation before heat damage spreads to the heating element, motor, or control system.
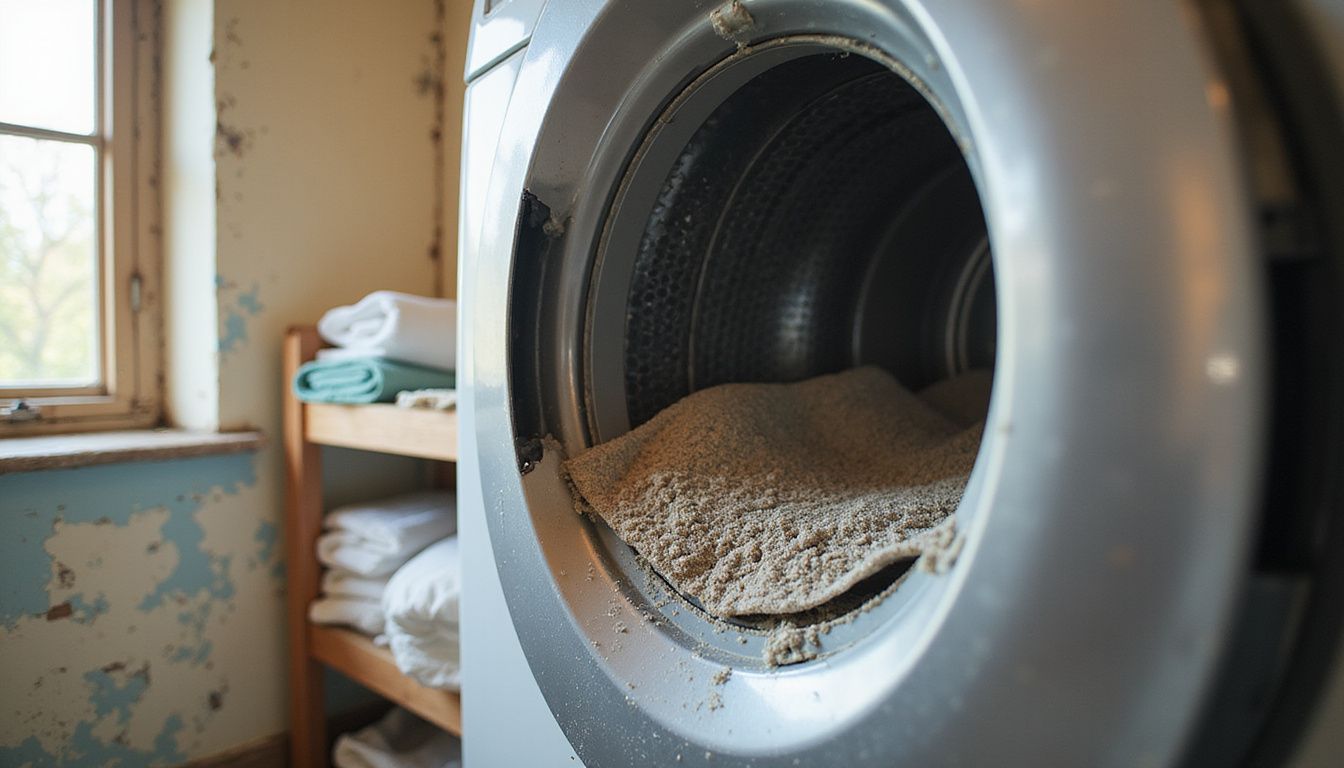
How to Identify Excessive Lint Buildup Around the Vent?
Visible lint around the exterior hood is a sign that the system is losing control of airflow. Lint may be catching at a damaged joint, collecting at a stuck damper, or backing up because the termination hood is partially blocked.
NFPA’s latest report on home fires involving clothes dryers and washing machines notes that dust, fiber, or lint was the first item ignited in a large share of dryer fires. That is why lint around the vent is more than a housekeeping issue, it is a repair signal.
- Check the hood flap while the dryer runs. It should open fully and close when the cycle ends.
- Look for lint stuck around caulk lines or duct joints, which can signal leaks.
- Inspect for leaves, nesting material, or a hood that no longer closes tightly.
If you want the fire data behind that guidance, the NFPA report on lint buildup and dryer fires is worth reading. In practice, cleaning the lint screen before every load and giving the full vent a deep cleaning at least yearly is the safer habit.
What Causes an Overheating Dryer or Hot Exterior?
Restricted airflow is the top reason a dryer overheats. When hot, damp air cannot leave the drum and duct, heat stays inside the cabinet and the outside panels start to feel much hotter than normal.
This can also happen with crushed venting, a blocked blower path, worn seals, or a thermostat that is no longer cycling heat correctly. A hot cabinet paired with long dry times is a strong sign that you need more than a lint-screen cleaning.
- Hot clothes at the end of a normal cycle
- More humidity than usual in the laundry room
- A dryer cabinet that feels unusually warm on the sides or top
- Frequent thermal shutoffs or repeated cycle restarts
Schedule professional maintenance to clean the vent system, inspect internal airflow parts, and test the thermostat before overheating damages the dryer.
Common Causes of Dryer Vent Damage
Most dryer vent failures come from three sources: lint that keeps building, flexible venting that gets crushed or kinked, and installation choices that make airflow weak from day one.
That is the part many quick online guides skip. A vent can be clean today and still perform badly if the duct is too long, too bent, or made from the wrong material.
For a general walkthrough, watch this repair and cleaning video.
How Does Lint and Debris Accumulate in Dryer Vents?
The lint screen catches a lot, but it does not catch everything. Fine fibers still move into the transition hose and the exhaust duct during every cycle, especially with towels, fleece, pet bedding, and large mixed loads.
Over time, those fibers collect at bends, sagging sections, rough interior surfaces, and the exterior hood. Outside debris can make the problem worse. Leaves, seed fluff, and bird nesting material often pile up right where airflow is already slowing down.
Manufacturer guidance from Maytag is a good benchmark here: the full venting path to the outside should be cleaned every 1 to 2 years at a minimum, and sooner if drying performance drops. If you have pets or do laundry almost every day, yearly service is the safer interval.
- Lint catches fastest at sharp bends and low spots.
- Exterior hoods often collect damp lint after rainy or windy weather.
- Pet hair creates denser clogs than lint alone.
- Longer vent runs need more frequent inspection.
What Problems Do Crushed or Kinked Vent Hoses Cause?
A crushed hose turns a working dryer into a slow, overheated one almost immediately. The opening narrows, airflow drops, and lint starts packing into the restriction instead of leaving the house.
Current GE and Samsung installation guidance is very consistent on this point: rigid metal is preferred, and listed foil-type transition duct should be used only when needed, kept short, and never hidden inside walls, ceilings, or floors. GE also limits foil-type transition duct to 8 feet, which shows how quickly flexible material becomes a performance problem when it is overused.
- The dryer runs hotter and longer.
- Lint builds up faster inside the hose folds.
- The hose tears more easily after the dryer is pushed back.
- Moisture can linger in the duct and feed mold or odor problems nearby.
If you see a long accordion-style hose snaked behind the dryer, that is often a repair job waiting to happen.
How Can Poor Installation Affect Dryer Vent Performance?
Poor installation can make a vent underperform even when it looks clean. A long run with several hard turns creates resistance, and every extra bend gives lint another place to settle.
As of the 2024 International Residential Code baseline used in many U.S. jurisdictions, dryer exhaust must terminate outdoors. If the manufacturer does not specify a location, the hood should be at least 3 feet from openings into the building, include a backdraft damper, and have no screen at the termination. That last point surprises a lot of homeowners, but screens trap lint quickly.
| Setup Choice | Why It Helps | What Usually Goes Wrong |
|---|---|---|
| Short, straight duct run | Moves moisture and lint out faster | Long run with several elbows slows airflow |
| 4-inch rigid metal duct | Smooth interior catches less lint | Plastic or thin foil collapses and traps debris |
| Proper outside hood with damper | Reduces backflow and pest entry | Screened or damaged hood clogs faster |
If your dryer has always struggled since installation, cleaning alone may not fix it. The route may need to be rebuilt.
What Tools Do You Need for Dryer Vent Repair?
You do not need a huge tool collection for basic dryer vent repair, but you do need the right few. The goal is simple: disconnect safely, remove lint fully, replace bad material, and seal the system back up without creating new leaks or lint traps.
If you want a quick tool overview first, watch this dryer vent tool video.
| Tool or Part | Best Use | Why It Matters |
|---|---|---|
| Vent brush kit | Loosening lint deeper inside the duct | Reaches bends and interior walls better than your hand |
| Shop vacuum with hose attachment | Removing loose lint at the dryer and wall opening | Keeps debris from settling back into the duct |
| Screwdriver or nut driver | Loosening and tightening clamps | Makes disconnecting and reconnecting safer and faster |
| UL-listed foil tape | Sealing metal duct joints | Handles heat better than cloth duct tape |
| 4-inch rigid metal duct and new clamps | Replacing damaged sections | Creates a smoother, safer airflow path |
How to Use a Dryer Vent Cleaning Brush Effectively?
Start by unplugging the dryer and disconnecting the vent. If you have a gas dryer, shut off the gas supply valve before you move the appliance.
A good brush kit helps because lint often sticks several feet past the wall connection, right where your hand cannot reach. One practical option many homeowners recognize is the Everbilt Dryer Vent Lint Removal Kit, which includes two brushes and a vacuum attachment for pulling loosened lint back out instead of pushing it deeper.
- Inspect the outside hood first and clear any obvious blockage.
- Brush from the dryer side with short, controlled strokes.
- Rotate the brush as you push so the bristles sweep the duct walls.
- Vacuum after each pass, especially near the dryer outlet and wall opening.
- Use extension rods only as needed, and avoid forcing them through a hard stop.
- Finish by checking the transition hose for cracks, kinks, or crushed spots.
If your vent run is long, vertical, or difficult to access, that is the point where professional equipment saves time and usually does a more complete job.
Why Are Screwdrivers and Duct Tape Essential for Repair?
A screwdriver or nut driver lets you remove clamps cleanly, inspect the connection points, and put the system back together without damaging the vent collar. That matters because loose clamps are one of the easiest ways for lint to leak into the laundry room or wall cavity.
The tape choice matters just as much. Use foil tape made for metal duct joints, not cloth duct tape. Heat, vibration, and humidity break down cloth-backed tape much faster, while foil tape keeps the joint sealed and the airflow path cleaner.
- Use the right driver bit so clamp heads do not strip.
- Wrap foil tape smoothly over clean, dry metal.
- Seal the joint, but do not bury the clamp under bulky tape layers.
- Recheck the joint after a short test cycle.
If the vent connection stays loose even with a new clamp, the duct end may be bent or worn and should be replaced.
When Should You Replace Vent Hoses and Clamps?
Replace the transition hose or clamps as soon as you see tears, crushed sections, separated joints, rust, or a hose that no longer holds its shape. A vent that is physically damaged cannot be fixed by cleaning alone.
Maytag’s current venting guidance is clear here: replace plastic or foil vent material with 4-inch rigid or flexible metal vent material. If a foil-type transition duct is the only workable option behind the dryer, use a listed product for that short visible connection and keep it as short as you can.
- Replace the hose after moving the dryer if it no longer springs back into shape.
- Swap old worm-drive clamps that slip or cannot tighten evenly.
- Upgrade immediately if your vent still uses plastic or vinyl.
- Replace both the hose and clamps together if the connection has been leaking lint.
That small upgrade usually pays back in better airflow, shorter dry times, and fewer repeat service calls.
How to Repair Dryer Vents Step-by-Step
A solid dryer vent repair follows the same order every time: disconnect safely, inspect the full route, remove lint completely, replace weak sections, and test airflow before you push the dryer back.
If you skip one of those steps, you often fix the symptom for a week and miss the real airflow problem.
How Do You Safely Disconnect and Inspect the Dryer Vent?
Start with safety. Unplug the dryer, shut off the gas valve if the unit is gas-fired, and give yourself enough room to inspect both the dryer connection and the wall connection.
- Pull the dryer forward carefully so you do not crush the existing hose even more.
- Loosen the clamp at the dryer outlet and the wall collar with a screwdriver or nut driver.
- Remove the transition hose and check it for tears, kinks, or heavy lint packing.
- Inspect the wall opening and the dryer’s exhaust port for lint, scorching, or loose debris.
- Run a dryer vent cleaning brush through reachable sections and vacuum loose lint as you go.
- Go outside and confirm the hood flap opens freely and closes fully after the dryer stops.
- If the material is plastic, vinyl, or badly crushed foil, replace it with rigid metal ducting or another approved metal option.
- Reconnect the duct, tighten clamps, and run a short cycle to confirm strong outside airflow.
- If you find heat damage, repeated blockages, or a complicated route through walls or ceilings, call a certified appliance technician instead of guessing.
Local code can change by city and state, so if your setup is unusual, treat the dryer’s installation manual and local code requirements as the final check.
What Is the Best Way to Clean Lint and Debris Thoroughly?
The best cleaning job removes lint from every stage of the path, not just the lint screen and the first foot of hose.
- Wear gloves and a dust mask before you start.
- Remove the lint screen and vacuum the lint-screen housing, because that area often hides compacted lint.
- Disconnect the transition hose and vacuum both ends of the connection.
- Brush the duct from the dryer side and then from the exterior side if both ends are accessible.
- Vacuum after each brushing pass so loosened lint does not slide deeper into the run.
- Clean the exterior hood and make sure the damper swings freely.
- Reconnect the vent with new clamps or foil tape if the old connection is weak.
- Run the dryer for 5 to 10 minutes and check the outside airflow. If it still feels weak, the restriction is farther down the line or the vent route is poorly designed.
One pro tip I share often: wash the lint screen itself with warm water and a soft brush every few months. Fabric softener residue can block airflow through the screen even when it looks clean.
Schedule professional help if you still see repeated lint blowback, hot cabinet temperatures, or weak airflow after a full cleaning.
How to Replace Damaged or Crushed Vent Hoses Correctly?
When the hose is torn or crushed, replacement is the real fix. Trying to reshape old foil or patch a split joint usually creates more places for lint to catch.
- Turn off power and gas, then pull the dryer forward for a full view of the existing route.
- Measure the shortest path from the dryer outlet to the wall collar before you buy materials.
- Choose 4-inch metal venting that matches the route and keeps bends to a minimum.
- Remove the old hose completely, especially if it is plastic, vinyl, or brittle foil.
- Install the new section without stretching or compressing it into hard turns.
- Secure both ends with clamps and seal metal joints with foil tape where needed.
- Test the dryer and confirm strong airflow at the outside hood.
- Push the dryer back slowly so the new hose does not kink.
The most overlooked part is the last step. A perfectly installed hose can be ruined in ten seconds if the dryer is shoved tight against the wall.
How Do You Secure Connections and Ensure Proper Alignment?
Good alignment keeps the inside of the duct smooth. Bad alignment creates little ledges and pinches where lint sticks, which means the clog starts rebuilding right away.
- Line up the dryer outlet and the transition hose before tightening the clamp.
- Keep the path as straight as the space allows.
- Use clamps for the main connection and foil tape for metal-to-metal joints that need sealing.
- Make sure the outside hood has a working backdraft damper and no screen.
- Check that the hose is not rubbing hard against the wall, baseboard, or gas line.
- Run a test cycle and listen for rattling, scraping, or air leaks.
If you hear air escaping inside the laundry room or see lint collecting around the connection after the test, the joint still needs work.
Professional Dryer Vent Repair Services
Some vent jobs are perfect for a careful homeowner. Others need professional tools, especially when the duct is long, concealed, damaged inside a wall, or still underperforming after a full cleaning.
That is where a repair visit pays off. You get a complete airflow diagnosis instead of another round of guesswork.
Appliance Repair Staten Island Inc. has served Staten Island since 1995, and the company offers same-day and emergency service for local homeowners who need vent cleaning, repair, or full dryer troubleshooting.
What Are the Benefits of Hiring a Professional Technician?
A professional technician does more than pull lint out of the first section of duct. The real value is spotting why the vent failed in the first place, whether that is a bad route, a damaged transition hose, a stuck damper, or an internal dryer problem that looks like a vent issue.
- You get a full-route inspection instead of a surface cleaning.
- You find hidden trouble points such as crushed sections, bad terminations, and leaking joints.
- You can confirm whether the vent path matches manufacturer guidance for length and bends.
- You reduce strain on the heater, motor, and thermal controls.
- You get documentation that helps with future maintenance and repeat visits.
- You save time, especially when the vent route is hard to access.
Consumer Reports has long recommended annual professional vent cleaning and inspection as a sensible safety step. In my experience, that advice makes even more sense in homes with pets, large families, or older vent layouts.
What Happens During a Professional Dryer Vent Repair Appointment?
A strong service visit should feel methodical, not rushed. The technician should confirm your symptoms first, because a dryer that runs hot, a dryer that runs long, and a dryer that trips safety controls can all point to slightly different failures.
| Appointment Stage | What the Technician Checks | Why It Matters |
|---|---|---|
| Initial diagnosis | Dry times, odors, heat, vent route, dryer type | Separates vent issues from internal dryer faults |
| Physical inspection | Transition hose, wall duct, outside hood, joints, clamps | Finds crushed, leaking, or blocked sections |
| Cleaning and repair | Lint removal, damaged part replacement, joint sealing | Restores airflow and reduces fire risk |
| Final test | Outside airflow, dryer operation, heat behavior | Confirms the repair actually solved the problem |
You should also expect clear next steps, including how often to clean the vent again based on how your home uses the dryer.
Dryer Duct Repair Solutions
Professional dryer vent repair is often the right answer when the duct route is damaged, too long, poorly aligned, or still restricted after DIY cleaning.
Our Staten Island team handles the problems homeowners see most: crushed transition ducts, separated joints, clogged exterior hoods, weak airflow, and code-upgrade work that replaces outdated plastic venting with safer metal duct solutions.
I have found that the fastest lasting fix is usually not a complicated one. It is a short, smooth vent path, properly clamped connections, a working exterior damper, and a dryer that is tested before the job ends.
If your dryer keeps overheating, needs multiple cycles, or leaves lint around the vent opening, schedule an inspection before the extra heat turns into a much bigger repair bill.
How Can You Maintain Your Dryer Vent System?
Good dryer maintenance is mostly about consistency. Small checks done on time prevent the big failures, and they help your dryer run faster, cleaner, and with less stress on the motor and heating system.
The two habits that pay off most are simple: keep the lint path clean, and do not ignore changes in dry time.
How Often Should You Schedule Cleaning and Inspections?
A fixed schedule works better than vague good intentions. The table below gives you a practical starting point for most U.S. homes.
| Frequency | Who Should Do It | What to Check | Why It Helps |
|---|---|---|---|
| Before every load | Homeowner | Clean the lint screen | Keeps airflow up and cuts lint carryover into the duct |
| Every month | Homeowner | Quick check behind the dryer and at the outside hood | Catches crushed hoses, stuck dampers, and visible lint early |
| Every 6 to 12 months | Heavy-use homes, pet owners, long vent runs | Deep clean or inspection | Prevents dense lint buildup in harder-to-reach sections |
| Every year | Most vented dryers | Full vent cleaning and airflow test | Annual service is a strong safety baseline for most households |
| Right away | Any home with warning signs | Burning smell, long dry times, hot cabinet, lint outside | Stops a clogged vent from becoming a fire or component failure |
If your manufacturer says every 1 to 2 years, treat that as the minimum. Homes with heavier laundry use usually benefit from yearly service.
Why Should You Avoid Overloading Your Dryer?
Overloading blocks tumbling and air circulation inside the drum. That means clothes dry unevenly, lint stays suspended longer, and more moisture has to fight its way out through the vent.
Maytag’s loading guidance makes the point clearly: when the drum is too full, air cannot move between items the way it should. That leads to longer dry times and extra heat buildup.
- Dry one wash load at a time instead of packing in more.
- Separate heavy towels from lighter clothing when possible.
- Stop if clothes are packed tightly enough that they cannot tumble freely.
- Use auto-sensing cycles for normal loads and reserve timed dry for special cases.
If you overload regularly, your dryer may seem like it has a vent problem even when the duct is fine. Good load size is part of vent performance.
What Are the Advantages of Using Rigid Metal Ducting?
Rigid metal ducting gives you the cleanest airflow path and the most dependable long-term setup. Its smooth interior catches less lint than flimsy flexible material, and it holds its shape when the dryer is moved back into place.
| Duct Type | How It Performs | Best Use |
|---|---|---|
| Rigid metal | Smooth interior, strong airflow, less lint buildup | Main exhaust run and most permanent installations |
| Semi-rigid metal | Better than foil, still flexible enough for tight spots | Short transition connection behind the dryer |
| Plastic or thin foil | Crushes easily and traps lint faster | Best replaced during repair or upgrade work |
That is why so many dryer manuals and code references push homeowners toward metal venting. It is not just about compliance. It makes the dryer work better.
What Are Important Safety Tips for Dryer Vent Maintenance?
Safety starts with short, repeatable checks. Look at the vent regularly, keep the outside termination clear, and treat heat or burning odors like urgent warnings, not inconveniences.
If you do that, you will catch most dryer vent problems before they turn serious.
How Often Should You Check for Blockages?
A quick homeowner check does not replace a full cleaning, but it does help you spot trouble sooner.
| When to Check | What to Look For | What to Do |
|---|---|---|
| Monthly | Crushed transition hose, lint behind dryer, weak outside flap movement | Correct the hose position and clear loose lint |
| Seasonally | Leaves, nests, storm debris, stuck dampers | Clean the exterior hood and verify it opens during a cycle |
| During laundry use | Longer dry times, hotter clothes, rising humidity | Move up your cleaning schedule or book an inspection |
| Yearly | Full vent route and airflow | Schedule professional cleaning and repair if needed |
One practical insider tip: homeowners sometimes add a mesh pest screen over the hood because it looks protective. It usually backfires. Screens catch lint fast, and the code baseline used in many U.S. areas does not allow them at the dryer termination.
Why Should You Avoid Using Plastic Vent Hoses?
Plastic vent hoses fail for the same reason they seem convenient: they are light, flexible, and easy to crush. Once they sag or flatten, lint starts collecting fast and airflow drops hard.
They also handle heat poorly compared with metal venting. That is why manufacturer guidance and current code practice steer homeowners away from plastic and toward metal duct material.
- Plastic traps more lint in folds and ridges.
- It tears or splits more easily when the dryer is moved.
- It is harder to keep aligned and fully open.
- It creates a higher fire risk than a smooth metal run.
If you still have plastic venting, treat replacement as a safety upgrade, not a cosmetic improvement.
How Can You Ensure Proper Venting to the Outdoors?
For a standard vented dryer, exhausting outdoors is the right setup. It removes heat, moisture, lint, and, in the case of gas dryers, combustion byproducts from the living space.
- Run the vent to the exterior, not into an attic, crawl space, wall cavity, or garage.
- Keep the route as short and straight as possible so airflow stays strong.
- Use 4-inch metal ducting for the main run and keep flexible transition material short and visible.
- Make sure the exterior hood has a working backdraft damper and no screen.
- Follow the dryer’s installation instructions for total vent length and allowable bends.
- If the manufacturer does not specify termination clearance, use the 2024 IRC baseline of at least 3 feet from openings into the building.
- For gas dryers, keep a working carbon monoxide alarm outside sleeping areas and on each level of the home, which matches current CPSC and USFA safety guidance.
- If you live in a property that uses an indoor lint trap box, verify that it is approved for an electric dryer only and maintained exactly as directed. HUD’s current inspection standard allows that type of setup only in that limited electric-dryer case.
If your outside hood barely opens, the vent line is too long, or the dryer still overheats after cleaning, it is time for a proper dryer vent repair inspection.
Conclusion
Good dryer vent repair and maintenance comes down to airflow, heat control, and quick action when warning signs show up.
Clean the lint screen, inspect the vent regularly, and do not ignore long dry times, burning odors, or a hot dryer cabinet.
If you need expert help in Staten Island, Eugene and the team at Appliance Repair Staten Island Inc. can inspect the vent, correct the ductwork, and get your dryer running safely again.
FAQs
1. What are common signs your dryer vent needs repair or maintenance?
Watch for long dry times, a burning smell, or excess lint near the appliance. These signs point to lint buildup and poor airflow, which raise fire risk and energy cost. Schedule Now to prevent damage and save on bills.
2. How often should you get dryer vent maintenance or vent cleaning?
Have a service professional inspect and clean your vent at least once a year, or more often if you run the dryer a lot. Learn More about our inspection standards.
3. Can you repair the vent yourself?
You can clear the filter and clean the accessible duct with a brush. For repairs or hard to reach vents, hire a certified technician who follows safety standards and offers a service guarantee. Schedule Now for safe, reliable repair.
4. What are the costs and benefits of professional dryer vent repair and maintenance?
Professional dryer vent repair has a modest cost and it cuts energy bills, reduces downtime, and lowers fire risk. Customers report faster dryer performance and peace of mind, so ask about technician credentials and a satisfaction guarantee. Learn More.
References
- https://www.landersappliance.com/dryer-smells-like-burning/
- https://dryerdoctors.com/dryer-maintenance-tips/dryer-overheating/
- https://www.dryerventwizard.com/locations/chino-hills/blog/common-causes-dryer-vent-damage-and-how-avoid-them
- https://vent-vision.com/blog/dryer-vent-cleaning-brush-whats-the-best-way-to-use-it/ (2025-03-21)
- https://www.consumerreports.org/appliances/clothes-dryers/how-to-clean-your-dryer-vent-a5519869329/
- https://www.dryerventwizard.com/locations/northern-california/blog/dryer-vent-repairs-when-to-patch-vs-replace (2025-04-29)
- https://www.nachi.org/inspecting-dryer-exhaust.htm
- https://www.homedepot.com/c/ah/how-to-clean-a-dryer-vent/9ba683603be9fa5395fab90104093975
- https://thediyplaybook.com/how-to-clean-dryer-lint/ (2025-02-10)
- https://deltaairductcleaning.com/complete-guide-to-dryer-vent-repair-and-installation/
- https://nes-co.com/professional-dryer-vent-cleaning-and-maintenance/ (2025-10-14)
- https://www.dryerventwizard.com/locations/chino-hills/blog/what-expect-during-professional-dryer-vent-cleaning
- https://dryerdoctors.com/dryer-vent-cleaning/how-often-needed/
- https://basc.pnnl.gov/resource-guides/proper-clothes-dryer-venting
- https://emersonproservices.com/flexible-vs-rigid-dryer-vents-which-is-better-for-you/ (2025-03-30)
- https://ciasrq.com/blog/dryer-vent-cleaning-maintenance
- https://www.beaconsaves.com/blog/why-cant-i-use-foil-or-plastic-dryer-vent (2026-01-17)